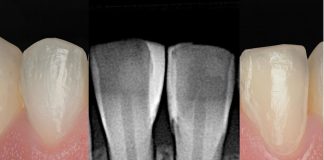
A bright, healthy smile not only boosts confidence but also enhances overall facial aesthetics. Modern dental advancements have made smile enhancement more accessible and effective than ever. A proven technique combines the simplicity of at-home whitening with carbamide peroxide and the precision of direct composite restorations, ensuring both visual improvement and lasting dental integrity.
This article delves into the home bleaching process, outlining its benefits and effectiveness in achieving a naturally radiant smile that stands the test of time.

Fig.1
The patient came to our clinic seeking a solution for his overall tooth discoloration and an aged restoration on his central incisor. His priority was a conservative approach that would enhance his smile while maintaining a natural look. After discussing his options, we recommended a home bleaching treatment followed by the replacement of the composite restoration on tooth number 21. The patient agreed to the proposed plan, ensuring a minimally invasive yet effective transformation.

Fig.2
Tooth number 21 and the canines should undergo bleaching first, as they are darker than the surrounding teeth, the two steps bleaching protocol will be applied. Once their shade matches the rest of the dentition, the bleaching process will be extended to all teeth.
The composite restoration on tooth 21 will be replaced after the final bleaching stage to ensure a harmonious and natural result.

Fig.3
Individualized trays were designed to perfectly conform to the patient’s dental structure. These custom-fit trays serve as a holder for the whitening agent, ensuring optimal application. The patient has received detailed guidance on their proper use to achieve the best possible results. Initially, the bleaching gel should be applied exclusively to the canines and tooth 21, as they are darker than the surrounding teeth. Once their shade blends harmoniously with the adjacent teeth, the whitening process will be extended to the entire dentition.
10% Peroxide Carbamide gel (White Dental Beauty, UK) was used over night for 2 weeks for the canines and the 21 and one month for the entire teeth.


Fig.4
After six weeks of bleaching, the overall tooth shade had improved, but tooth 21 remained noticeably darker than the surrounding teeth. To achieve a uniform appearance, the decision was made to replace the existing restoration with a direct composite veneer, ensuring a seamless and natural-looking result.

Fig.5
Two weeks after the bleaching process, tooth 21 was carefully prepared for the application of a direct composite veneer.

Fig.6
A rubber dam was applied to ensure a dry, contaminant-free working environment, providing optimal isolation from moisture and enhancing the precision of the procedure.

Fig.7
Tooth number 21 was fully restored using a direct composite veneer. Following the removal of the rubber dam, it appeared slightly darker due to temporary dehydration from the isolation process (restoration performed by Dr Jordi Manauta).

Fig.8
The final outcome after one week, particularly once the teeth rehydrated, revealing their natural brightness and uniform appearance.

Fig.9
The before-and-after comparison highlighted a significant improvement in anterior aesthetics.
The patient was extremely pleased with the transformation, expressing great satisfaction with the final result.
Conclusions
In summary, modern dental treatments prioritize aesthetic enhancement while maintaining natural tooth integrity through minimally invasive techniques.
This approach involves a two-step bleaching process, targeting darker teeth such as canines and tooth number 21 first , followed by comprehensive whitening. Subsequently, a direct composite restoration is used to replace an outdated or defective restoration, ensuring both function and aesthetics.
Bibliography
- Sara Laface. When a tray solves it all (part 2): The two-step bleaching protocol. Styleitaliano.org
- Sara Laface. Bleach and Restore: Achieve a radiant smile without invasive procedures. Styleitaliano.org
- Rim Bourgi. Evolution of dental bleaching, from research to clinical evidence. Styleitaliano.org