


A clinical case by our Community member Dr. Abdelrahman Mohammed El Gamal
This article and its content are published under the Author’s responsibility as an expression of the Author’s own ideas and practice. Styleitaliano denies any responsibility about the visual and written content of this work.
Diastema closure is a precise procedure requiring a predictable, systematic approach to achieve optimal aesthetic outcomes. A thorough analysis of the preoperative condition is paramount to success. By combining meticulous planning with straightforward, reliable clinical techniques, practitioners can ensure beautiful results while preserving function and biological integrity.
This article presents a simplified, predictable protocol for successful diastema closure.

Fig.1
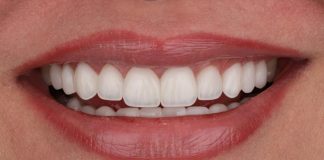
The patient presented to the clinic complaining of dissatisfaction with his smile. Seeking aesthetic improvements to his smile. Specifically, the patient’s primary concern was the presence of a midline diastema, and he requested a comprehensive treatment plan to close the space and enhance his overall smile aesthetics.

Fig.2
Retracted view with a contrastor highlighting the specific area of concern. The treatment plan addresses the four front teeth to elevate the patient’s smile.

Fig.3
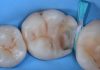
Occlusal view.

Fig.4
A rubber dam was applied for isolation. Sandblasting was then performed using 29_micron aluminum oxide. Next, the bonding protocol was initiated by applying two layers of adhesive with active rubbing to ensure optimal resin infiltration and maximize bond strength. The composite building process began incisally with the placement of the halo layer ,which allowed for necessary space redistribution to achieve identical widths for both central incisors. Then, the width of both centrals was subsequently measured for confirmation by caliper. After this stage, two critical perspectives were evaluated: The labial and incisal views, to ensure the halo layer was accurately positioned in its natural anatomical orientation.

Fig.5
To explain this technique in greater detail, a high viscosity composite material (Dentin shade) was selected to ensure optimal handling during the fabrication of the Halo layer:
- Initial Adaptation; the composite was preshaped manually with a clean, gloved finger into a uniform, elongated strand prior to placement. Application began on the distal side, ensuring precise adaptation to the tooth structure (indicated by the first arrow), before being extended across the entire incisal edge to the mesial boundary.
- Mesial Reconstruction; Next, two dry bonding brushes were utilized to build the mesial portion of the halo, A dual brush technique was employed: one brush was positioned palatally to provide structural support and stabilization, while the second brush was used labially to contour and shape the halo (indicated by the second arrow) concurrently, the fine tip of an LM fissura instrument (LM-Dental, Parainen, Finland) was utilized to define and control the dimensions of the future incisal embrasure.
- Polymerization; to maintain structural integrity throughout the process, the palatal brush was kept fixed in position. The labial brush was then removed immediately prior to initiating the light curing cycle (indicated by the third arrow).

Fig.6
A thin Enamel composite layer was applied in areas indicated by yellow color.

Fig.7
Following the application of the dentin layer, internal staining was placed between the incisal halo and the mamelons to replicate natural translucency.

Fig.8
Next, an enamel layer was applied incisally over the incisal translucency. Sectional matrices were then positioned to reconstruct the proximal walls, establishing natural contours, contact points, and embrasures. To prevent open contacts during adjacent restorations, the first tooth was completed, and its matrix was removed before proceeding the second tooth.

Fig.9
Postoperative occlusal view.

Fig.10
Frontal smile photograph, highlighting the successful closure of the midline diastema and aesthetic shape correction of the four maxillary incisors.
Conclusions
Achieving optimal esthetics in diastema closure cases can be clinically challenging, requiring precision, appropriate material selection, and a comprehensive understanding of smile parameters. Because the symmetry and form of the two central incisors are critical to an attractive smile, they must be identical in size and proportion. The ideal outcome can be achieved using a straightforward, highly predictable technique that significantly reduces clinical chair time.
Bibliography
A special thanks to Professor Louis Hardan my mentor, for his contribution to this technique.
- Hardan L, Bourgi R, Kharouf N, Mancino D, Zarow M, Jakubowicz N, Haikel Y, Cuevas-Suárez CE. Bond strength of universal adhesives to dentin: A systematic review and meta-analysis. Polymers. 2021 Mar 7;13(5):814.
- Dietschi D, Fahl N Jr. Shading concepts and layering techniques to master direct anterior composite restorations: an update. Br Dent J. 2016 Dec 16;221(12):765-71.
- Layers 2 (Direct Composite Restorations), The Styleitaliano Clinical Secrets. Manauta, Salat, Devoto, Putignano, Quintessence Publishing 2022.