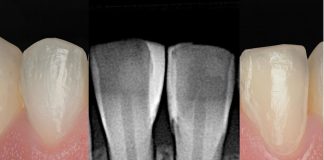
A clinical case by our Community member Dr. Tarek Hammad
This article and its content are published under the Author’s responsibility as an expression of the Author’s own ideas and practice. Styleitaliano denies any responsibility about the visual and written content of this work.
Class IV restorations involve the reconstruction of anterior teeth affected by incisal edge fractures that extend into the proximal surface. Although often considered “simple,” Class IV restorations are among the most technique sensitive procedures in adhesive dentistry due to their high aesthetic demand and functional exposure.
The main difficulty in Class IV cases is not bonding but reproducing natural optical behavior. Incisal fractures disrupt enamel continuity, translucency, and light reflection. Even small defects can lead to visible asymmetry because the incisal edge is a key aesthetic focal point during speech and smiling.
Additionally, these restorations are subjected to high shear and tensile forces, functional and parafunctional loading and immediate visual scrutiny by the patient.
Successful Class IV restorations rely on precise anatomical stratification rather than shade matching alone. A palatal enamel shell establishes the correct incisal edge position and length, dentin layers restore opacity and internal chroma, and translucent incisal enamel recreates depth and natural light diffusion.
Finishing is not an optional step, it defines the final outcome. Proper line angles, controlled surface texture, and refined incisal micro-anatomy govern light reflection and determine whether the restoration integrates seamlessly with the natural tooth.

Fig.1
A 23-year-old female patient presented following an incisal fracture of a single maxillary central incisor. The remaining tooth structure was sound, with sufficient enamel to support a conservative restorative approach.
After careful evaluation of incisal edge position, proportions, and surface texture, a minimally invasive direct composite restoration was selected. The goal was to reconstruct the fractured area while preserving maximum healthy tissue and respecting the natural morphology of young anterior teeth.

Fig.2
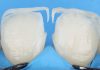
This step is crucial and must be performed after careful examination and detailed analysis of tooth morphology to accurately identify the shade distribution across different tooth surfaces. Shade selection should be completed before rubber dam placement to prevent dehydration-related color changes. The process was carried out using the composite button technique, assisted by a polarized filter to eliminate surface reflections and reveal true tooth-composite colors. Shade selection was further verified using a VITA Easy-shade spectrophotometer and cross-checked with the VITA Classic shade guide.

Fig.3
No extensive preparation is necessary. Sharp enamel margins were gently smoothed, and a shallow enamel bevel was created to enhance the bonding surface and improve the optical blending between the tooth and the composite. Selective enamel etching with phosphoric acid was done to optimize enamel adhesion, extending the etchant slightly beyond the bevel to achieve a seamless restorative transition.

Fig.4
Following adhesive application using OptiBond Universal by Kerr (Kerr Corporation, Orange, CA), thorough agitation, air thinning and polymerization, the palatal enamel was reconstructed. This was done using Harmonize Incisal Clear by Kerr (Kerr Corporation, Orange, CA). This step defines the incisal edge position, length, and guidance. A freehand technique was used; however, precision at this stage greatly simplifies all subsequent restorative steps.

Fig.5
Dentin shade composite Harmonize A3D by Kerr (Kerr Corporation, Orange, CA) was added to restore internal anatomy and chroma. Also, a thin rolled dentin shade composite layer was added on the incisal edge to give the opaquer halo effect. Opaque white characterization stains were added and brushed over specific areas to mimic the adjacent natural tooth.

Fig.6
To recreate translucency and depth, enamel and incisal shades were applied using the Harmonize A2E by Kerr (Kerr Corporation, Orange, CA). Thickness was carefully controlled, especially at the incisal edge, to mimic natural light transmission. Before final curing, line angles, embrasures, and facial convexities were refined. Proper anatomy at this stage reduces the need for aggressive finishing later.

Fig.7
After rubber dam removal, refined margins, incisal edge continuity, and surface texture were established using fine-grit discs and finishing stones; recreating natural micro- and macro-texture to control light reflection. Polishing was performed to achieve a natural enamel gloss without flattening anatomy. A controlled, stepwise polishing protocol was carried out using 2-step EVE Twist (EVE Ernst Vetter GmbH, Birkenfeld, Germany) to ensure long-term aesthetics and patient satisfaction.

Fig.8
Frontal clinical photograph illustrating conservative direct composite restoration of the maxillary central incisors, achieving improved aesthetics and symmetry.
Conclusions
Direct composite restorations, when guided by sound principles of adhesion, morphology, and optical control, remain a powerful tool for achieving highly aesthetic and conservative outcomes.
In this case, a minimally invasive approach allowed the preservation of sound enamel while restoring harmony, symmetry, and natural light dynamics of the maxillary anterior teeth. Careful attention to surface texture, line angles, and final finishing was essential in mimicking natural enamel and ensuring seamless integration with the surrounding dentition.
Simplicity in materials and protocol, combined with precision in execution, confirms that predictable and refined anterior aesthetics can be achieved without overcomplication, staying true to the philosophy of minimally invasive dentistry.
Bibliography
- Angelo Putignano. Recipe for Class IV Restorations. Styleitaliano.org
- Walter Devoto. Index-free Class IV complete step-by-step. styleitaliano.org
- Paulo Monteiro. The step by step in finishing and polishing: anterior direct composite restorations. styleitaliano.org
- Villarroel M, Fahl N, De Sousa AM, De Oliveira OB Jr. Direct Esthetic Restorations Based on Translucency and Opacity of Composite Resins
- 5. D Dietschi, N Fahl Shading concepts and layering techniques to master direct anterior composite restorations
- Brian P LeSage. Aesthetic anterior composite restorations: a guide to direct placement