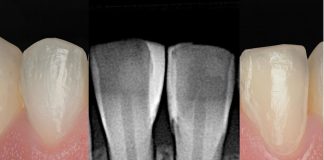
In the realm of modern dentistry, achieving optimal aesthetic results while maintaining simplicity in restorative procedures is a key goal. By utilizing advanced materials and techniques, we can achieve natural-looking results without the need for complex layering or incisal effects. Through a thorough diagnostic appointment, we can determine the most appropriate approach—whether a single or multi-shade—to ensure a harmonious blend with the surrounding dentition.


Fig.1
A 40-year-old female patient came to the office seeking a conservative solution for her central incisors. She mentioned that she had broken them during her teenage years and now wanted to repair them for aesthetic reasons. However, she had always refused any treatment because she didn’t want to “mutilate” her teeth. We offered her the option of two direct composite restorations with minimal or no preparation. Before proceeding, we suggested teeth whitening, which she accepted. We then began with the photographic protocol.

Fig.2
When she accepted the treatment plan, we performed the intraoral scanning.

Fig.3
Intraoral scan detail.

Fig.4
This allowed us to analyze the areas of the teeth that needed restoration and assess the available occlusal space.

Fig.5
In the software, we created the digital wax-up.

Fig.6
The digital workflow provides us with numerous benefits.

Fig.7
It is very important to preserve the sound palatal surface of the teeth being restored.

Fig.8
We tested the final shape of the restorations using a mock-up made from the digital wax-up. In this case, we used Protemp™ 4 in color A2 (Solventum) and showed the patient the result with a photo taken on her phone in selfie mode.

Fig.9
As part of the photographic protocol, we tested the shade using polarized photography to accurately assess the true hue of the teeth during the whitening process.

Fig.10
Once we achieved the desired shade the patient wanted, we waited at least 15 days before starting the restoration process to avoid any issues with the adhesion phase.

Fig.11
To test the color, we performed a realistic try-in using two different shades: Filtek™ Universal Restorative Shade XW (Solventum) and Filtek™ Universal Restorative Shade B1 (Solventum).


Fig.12
To address our uncertainties, we took a polarized photo to aid in the final decision, ultimately choosing Filtek™ Universal Restorative Shade XW (Solventum).

Fig.13
After isolation, which is essential in all restorative procedures, we protected the adjacent teeth with a metal matrix or Teflon tape and applied phosphoric acid.

Fig.14
We used Scotchbond™ Universal Etchant (Solventum).

Fig.15
and left it on the enamel for 20 seconds.

Fig.16
Aspect after the etching procedure.

Fig.17
After rinsing and cleaning off the acid, we proceeded to apply the adhesive, Scotchbond™ Universal Plus Adhesive (Solventum), properly to ensure the longevity and safety of the restorations.


Fig.18
For the stratification, we used an index made with Impregum™ Super Quick Polyether Impression Material (Solventum). We then applied the composite, Filtek™ Universal Restorative Shade XW (Solventum).

Fig.19
For the stratification, we used an index made with LM-Arte Modella Dark Diamond™ polyether.

Fig.20
We performed the finishing and polishing procedures using the essential shape technique by Styleitaliano, and this is the immediate result after removing the rubber dam.

Fig.21
Checkup after three weeks.

Fig.22
The final smile improved with just one shade, simplifying the procedures.

Fig.23
After one year, we assessed the integration of the restoration and its match with the surrounding dentition using universal shades.

Fig.24
One year follow-up.
Conclusions
Many dental procedures can be successfully addressed using only one shade, not just in posterior restorations but also in anterior cases with high aesthetic demands. In this instance, we determined that reproducing any incisal effects was unnecessary, and we could achieve natural results and good aesthetics with a single color. The diagnostic appointment is crucial in deciding whether to use a polychromatic restoration or a single-shade option.
Bibliography
- Manauta J, Salat A, Devoto W, Putignano A. Layers 2. Direct Composites: The Styleitaliano Clinical Secrets.
- Manauta J, Salat A, Putignano A, Devoto W, Villares CF, Hardan LS. Natural, polarized light and the choice of composite: a key to success in shade matching of direct anterior restorations – Part I. Odontostomatol Trop. 2016 Sep;39(155):11-9.
- Hardan L, Bourgi R, Cuevas-Suárez CE, Zarow M, Kharouf N, Mancino D, Villares CF, Skaba D, Lukomska-Szymańska M. The Bond Strength and Antibacterial Activity of the Universal Dentin Bonding System: A Systematic Review and Meta-Analysis. Microorganisms. 2021 Jun 6;9(6):1230.