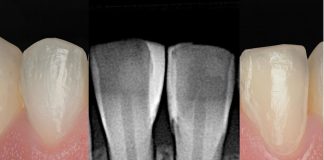
A clinical case by Dr. Bianca Varvara and Dr. Paulo Monteiro
In modern dentistry, achieving a natural and aesthetically pleasing smile is a top priority for both patients and clinicians. Direct composite veneers have become a popular choice due to their conservative approach and the ability to immediately enhance the smile without extensive tooth preparation. One of the key factors in obtaining a successful aesthetic outcome with composite veneers is the appropriate selection of materials, particularly when it comes to the opacity and translucency of the resin. The use of composite systems, such as 3M™ Filtek™ Supreme XTE (Solventum, St. Paul, MN, USA), offers a wide range of opacities that allow clinicians to closely mimic the natural layers of enamel and dentin, resulting in lifelike restorations.
This article aims to explore the use of composite resins with varying opacities in direct veneers, focusing on how these materials can be utilized to enhance the aesthetic appearance of patients’ smiles. By layering resins of different translucencies and shades, it is possible to replicate the complex optical properties of natural teeth, ensuring that the final restorations are not only functional but also blend seamlessly with the surrounding dentition.




Fig.1
Initial Situation: An adult patient presents with aesthetic concerns in the anterior region, including an imbalance in soft tissue levels and anterior tooth shape. The patient prefers to avoid orthodontic treatment and opts for additive composite resin restorations to enhance their smile’s appearance.

Fig.2
To achieve a predictable smile enhancement and restoration of tooth shape, a Digital Smile Design (DSD) was performed. This process provided a preview of the final outcome and facilitated the creation of a wax-up model and silicone index for precise execution.

Fig.3
Before initiating the restorative procedure, a gingivectomy was performed to achieve better harmony and alignment of the gingival cervical levels.

Fig.4
Following the gingivectomy, a mock-up was created using 3M™ Protemp™ 4 (Solventum, St. Paul, Minnesota, USA) to effectively communicate and align with the patient on the final aesthetic expectations.

Fig.5
Situation after the gingivectomy.

Fig.6
Rubber dam placement and retraction with clamps.

Fig.7
A prophylaxis of the tooth surface was performed using Aquacare Twin (Velopex International, London, UK) to ensure optimal surface preparation for the restorative procedure.

Fig.8
Phosphoric etching of the enamel for 30 seconds.

Fig.9
After rinsing off the phosphoric acid etchant and drying the tooth surface, 3M™ Scotchbond™ Universal Plus adhesive (Solventum, USA, St. Paul) was applied. The adhesive was gently rubbed onto the surface for 15 seconds, followed by a gentle air spray to thin the adhesive layer. Finally, the adhesive was light-cured.


Fig.10
Try-in of the silicon index with the new shape and length of the anterior teeth.

Fig.11
A thin layer of 3M™ Filtek™ Supreme CT Effect composite (Solventum, USA, St. Paul) was applied to the silicone index to create a palatal shell.

Fig.12
The silicone index was placed in the mouth and positioned to create the palatal shell.

Fig.13
In this case, various composite resin opacities and shades of 3M™ Filtek™ Supreme (Solventum, USA, St. Paul) were used to achieve the desired aesthetic result. The specific shades and opacities selected would depend on the clinical requirements for the restoration, including the natural color and translucency of the tooth structure.

Fig.14
After shaping the palatal enamel, the incisal dentin was created using 3M™ Filtek™ Supreme Body A2 (Solventum, USA, St. Paul) to ensure a smooth transition and seamless connection between the remaining tooth structure and the composite restoration. The body opacity was chosen over the dentin opacity due to the limited space available in the incisal third of the tooth, allowing for a more natural appearance and better adaptation of the material.

Fig.15
After creating the palatal enamel and body opacity, the interproximal surface was shaped using a thin layer of 3M™ Filtek™ Supreme Enamel A1 (Solventum, USA, St. Paul) and the QuickmatFLEX sectional matrices from Polydentia.

Fig.16
The situation after the interproximal walls were completed on the two central incisors.

Fig.17
A thin dentin roll was placed along the incisal edge to create an incisal halo illusion, using 3M™ Filtek™ Supreme Dentin A2 (Solventum, USA, St. Paul).

Fig.18
The space between the halo and the body opacity composite was filled with a translucent composite resin, 3M™ Filtek™ Supreme CT Effect (Solventum, USA, St. Paul). This approach allowed for the creation of a natural translucency effect in the incisal third of the anterior teeth.

Fig.19
As an external enamel composite layer, 3M™ Filtek™ Supreme Enamel A1 (Solventum, USA, St. Paul) was used to achieve an enamel-like vestibular surface. The composite was placed using the Solo Anterior instrument from LM Dental (LM, Finland).

Fig.20
View of the clinical situation immediately after the composite placement.

Fig.21
Finishing procedures were performed using 3M™ Sof-Lex™ discs (Solventum, USA, St. Paul) to correct the shape and volume of the restoration.

Fig.22
Using a pencil, macro-textures and angle lines were drawn to replicate natural tooth proportions and effects, ensuring the most predictable and aesthetic outcome in the final restorations.

Fig.23
The vertical macro-texture was created using a conical grain burr at low speed.

Fig.24
Pre-polishing procedures were performed using 3M™ Sof-Lex™ spiral (Solventum, USA, St. Paul) to smooth the composite surface. This procedure was carried out with water at low speed.

Fig.25
Polishing procedures were performed using 3M™ Sof-Lex™ diamond spiral (Solventum, USA, St. Paul) to achieve a high-luster composite surface. This procedure was carried out with water at low speed, continuing until the desired shiny surface was attained.


Fig.26
As the final polishing step, a soft polishing paste, such as the Lucida system from Diashine, was used with a smooth felt to achieve a high-gloss finish on the restoration.

Fig.27
The Lucida polishing system creates a highly smooth composite surface with a natural finish, providing an enamel-like glossy appearance.

Fig.28
The final clinical situation after hydration reveals the seamless integration and natural outcome of the composite restorations.
Conclusions
The use of composite resins with varying opacities, such as 3M™ Filtek™ Supreme XTE (Solventum, USA, St. Paul), plays a crucial role in achieving natural and aesthetically pleasing results in direct composite veneers. By carefully selecting and layering different opacities and shades, clinicians can mimic the optical properties of natural enamel and dentin, enhancing the overall appearance of the patient’s smile. This approach ensures seamless integration with the surrounding dentition while providing a conservative and cost-effective solution for smile rehabilitation. Ultimately, mastering the use of these advanced resin systems allows dental professionals to deliver highly customized and visually appealing outcomes that meet both functional and aesthetic expectations.
Bibliography
- Dietschi, D., & Devigus, A. (2011). Composite Materials: Advances in Properties and Shade Matching. Quintessence International, 42(7), 557-568.
- Fahl Jr, N. (2016). Aesthetic Composite Bonding: Techniques and Materials to Meet Patient Expectations. Journal of Esthetic and Restorative Dentistry, 28(S1), S41-S55. doi:10.1111/jerd.12204.
- LeSage, B. P. (2011). Aesthetic Anterior Composite Restorations: A Guide to Direct Placement. Practical Procedures & Aesthetic Dentistry, 23(4), 255-262.
- Vanini, L. (1996). Light and Color in Anterior Composite Restorations. Practical Periodontics & Aesthetic Dentistry, 8(7), 673-682.
- Rosenthal, S., & Mormann, W. H. (2006). The Esthetic Layering Technique Using Composite Resins. International Journal of Periodontics & Restorative Dentistry, 26(5), 487-494.
- Manhart, J., Chen, H. Y., Hickel, R., & Kunzelmann, K. H. (2000). Mechanical Properties and Wear Behavior of Light-Cured Packable Composite Resins. Dental Materials, 16(1), 33-40. doi:10.1016/S0109-5641(99)00092-4.
- Shillingburg, H. T., Hobo, S., & Whitsett, L. D. (1997). Fundamentals of Fixed Prosthodontics (3rd ed.). Quintessence Publishing Co., Inc.